To run the containerized applications at large, Kubernetes and AWS (Amazon Web Services) provide a complete environment maintaining the clusters.
Kubernetes is an open software that manages clusters of Amazon EC2. The instances are created and maintained with processes for deployment, maintenance, and scaling.
The benefit of adopting Kubernetes is to run containerized applications of all types using the same tool set on-premises and in the cloud.
AWS environment fully supports the Kubernetes cloud environment with scalable and highly-available virtual machine infrastructure, community-backed service integrations, and Amazon Elastic Kubernetes Service (EKS).

When we talk about the AWS native infrastructure, it completely differs from Kubernetes requirements.
However, many IT giants have put together their solutions and guides for setting up Kubernetes on AWS.
Here in this post, we are going to discuss the 3 ways that are available to run Kubernetes on AWS which includes setup & install Kubernetes Cluster on AWS KOPS, Rancher & EKS .
Why Use Kubernetes?
When it comes to running applications in a virtual environment, the main challenge is to configure the applications and make changes during the time of deployment, Thus, the process is time-consuming and costly.
Most of the time, it takes a lot of effort to fix the issues.
Kubernetes is the ultimate solution that provides an environment to run containerized applications anywhere without any modifications. Kubernetes has built its large community in a short period, improving and modifying its environment.
Additionally, many other open-source projects and vendors build and maintain Kubernetes-compatible software to improve and extend their applications from the future perspective.
Some of the advantages of using Kubernetes for applications to run comprise of:
Running Scalable Applications
Kubernetes provides a cutting edge to run the applications at a scale without actually configuring and connecting with various servers.
Effortlessly Move Applications
Kubernetes allows containerized applications to move from local development machines to production deployments on the cloud using the same operational tools.
Run Anywhere/ Anytime
Kubernetes clusters are designed to run anywhere/ anytime. Like in this post, we are discussing the AWS platform to run the Kubernetes clusters. Its compatibility and ease of running on-premises and on the cloud are commendable.
Ease to Add Functionality
Kubernetes is an open-source platform and still in its growing stage. However, it has support from the big dev community and companies. It helps in building extensions, integrations, and plugins to make Kubernetes a popular platform to run applications.
How Kubernetes Works?
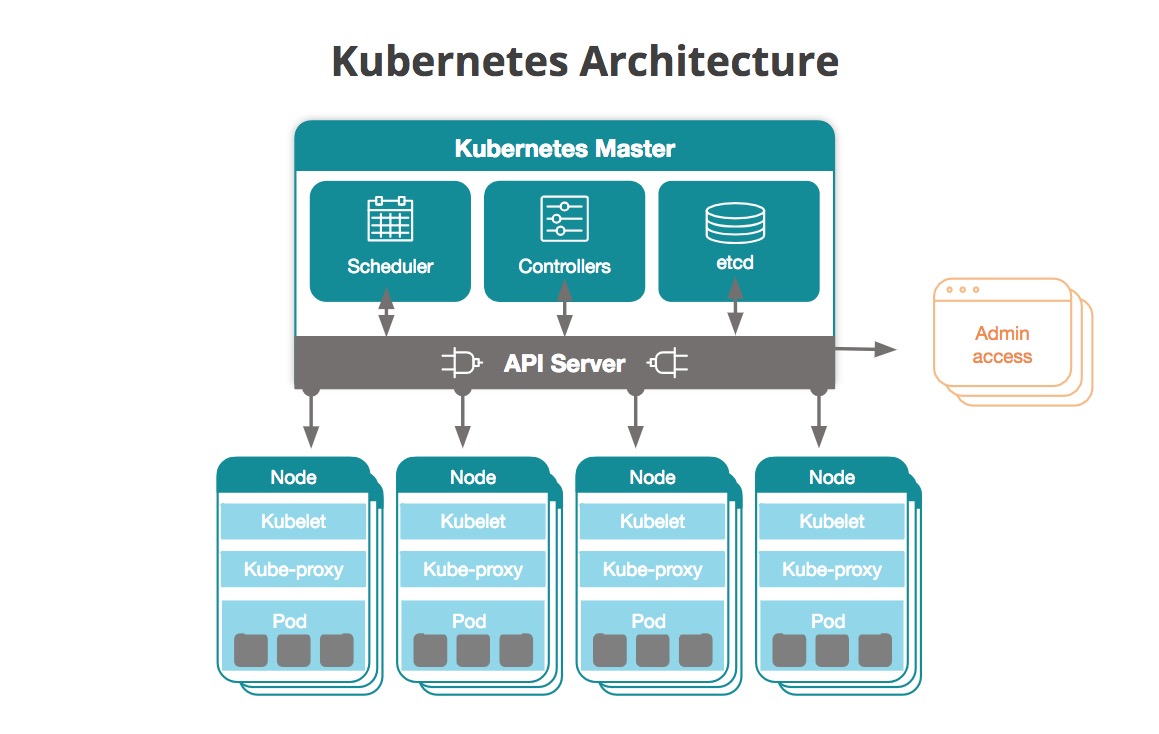
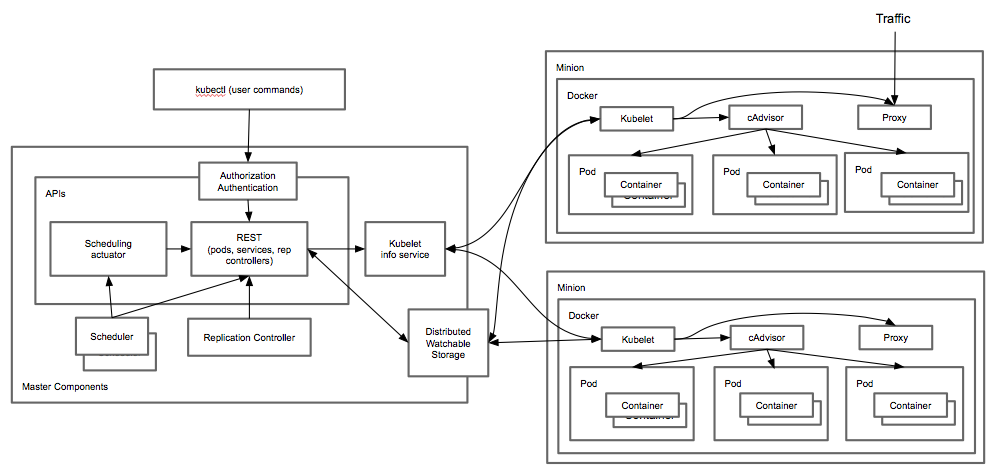
The basic architecture of Kubernetes comprises clusters that can be accessed using the instance types. A scheduling structure is followed to make the computing resources available and to fulfill the requirements of the containers.
On the other hand, the containers are run in logical groups. These groups are named pods and you can run and scale one or many containers together as a pod.
The control plane software then decides to schedule and run various created pods. The pods are responsible for managing traffic, routing, and scales your applications.
Kubernetes automatically starts pods on your cluster based on their resource requirements. The Kubernetes ensure and restart the pods whenever they fail to run automatically.
Each pod has a valid IP address and a single DNS name. The DNS name is used to make an external connection with other cloud services.
Cluster Operations & Management
A rancher is a tool that can act as a centralized control plane to manage your Kubernetes cluster running across your organization.
Rancher is developed to solve operational challenges, like cluster provisioning, upgrades, user management, and policy management.
Some of the tasks performed by tools like Rancher are:
- Deploy & monitor clusters on any infrastructure
- Centralized security policy management
- Integrated Active Directory, LDAP, and SAML support
- Smart DNS provisioning for every application
- Protect and recover from cluster failures
App Workload Management
Kubernetes guarantees service availability as it contains powerful functionality for orchestrating applications. The tools like Rancher provide an attractive UI and workload management layer to Kubernetes.
This layer simplifies adoption and integrates CI/CD along with open source projects such as Prometheus, Grafana, and Fluentd.
Some of its benefits include:
- Complete UI for workload management
- User projects spanning multiple namespaces
- Global and private application catalogs
- Enhanced observability
Enterprise Support
Kubernetes uses integrated cloud-native tooling while complying with corporate security and availability standards.
It has the full support of enterprise-grade support services to deploy Kubernetes in production at any scale.
Kubernetes has a team of experts who ensure you get the help you need.
- 100% Free & Open Source
- No Vendor Lock-In
- All-time support
Run Kubernetes On AWS
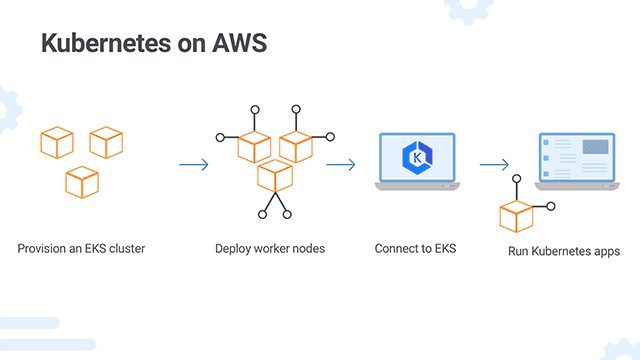
Since Kubernetes and AWS, both provide a flexible and systematic approach to run applications, your dev team can easily deploy, configure, and manage your deployment by yourself for full flexibility and control.
You also have the option of using either AWS-provided services or third-party services to manage your implementation.
For the management of the Kubernetes, there are various ways.
Let’s learn three ways to configure Kubernetes with AWS.
kops
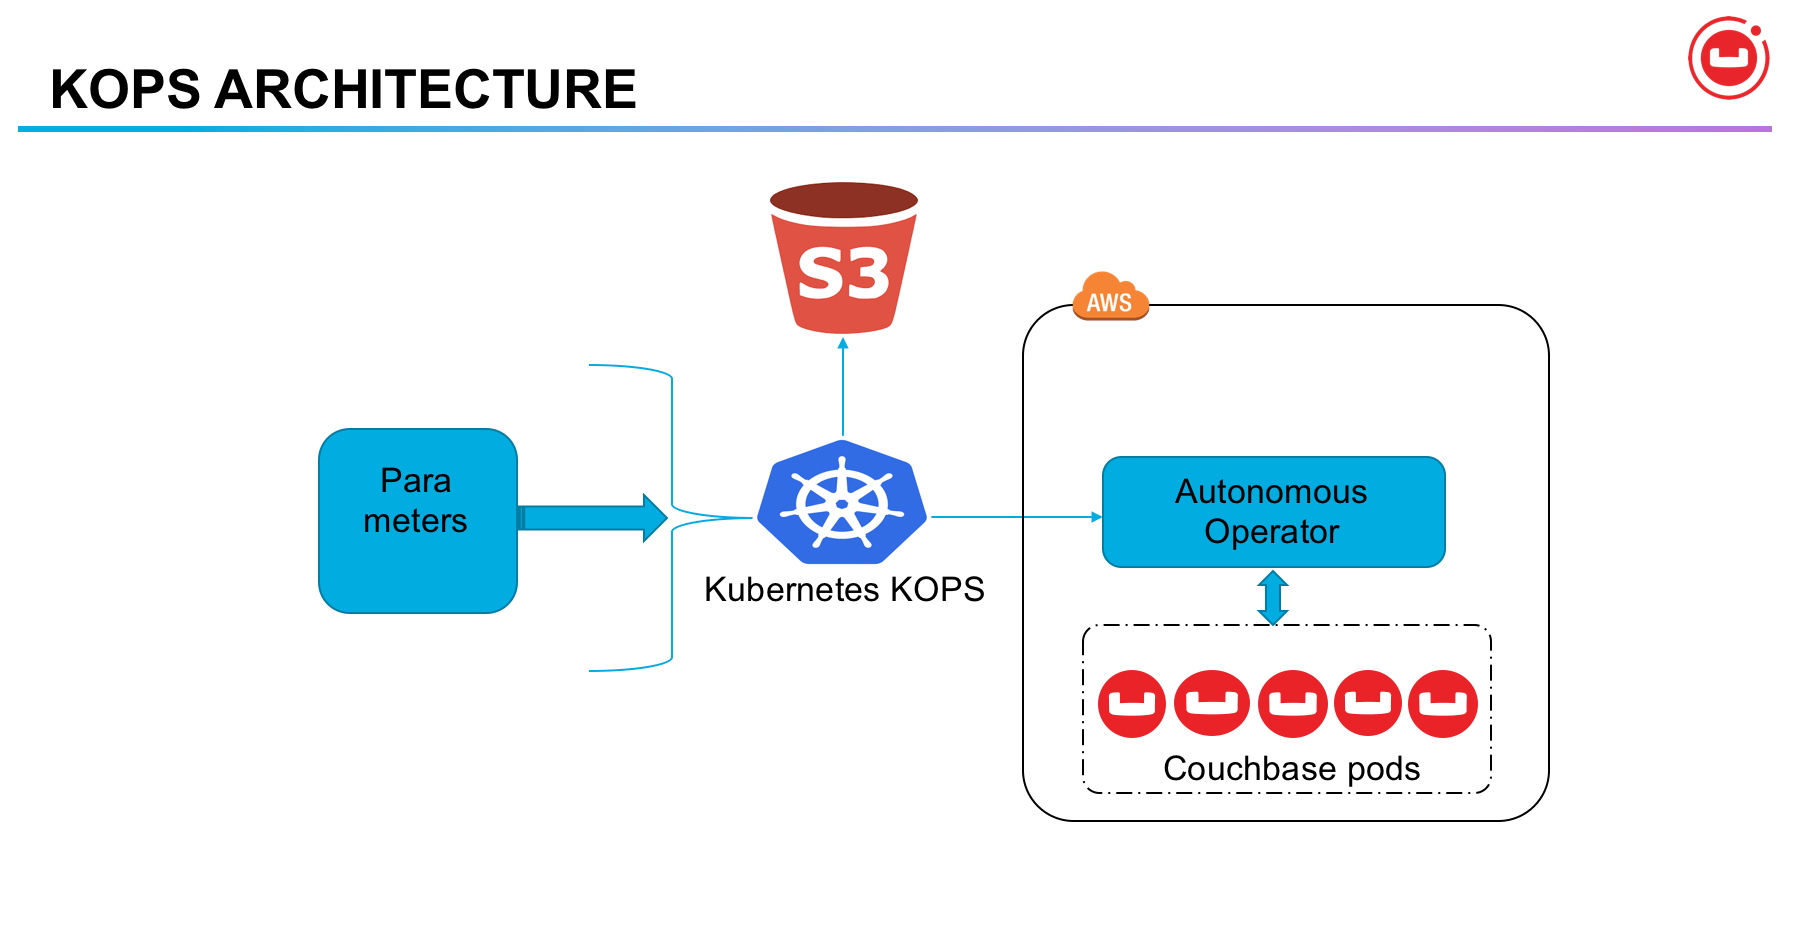
It is one of the efficient tools that automates the provisioning and management of clusters in AWS.
However, it is not considered as a managed tool but helps in enabling and simplifying the deployment and maintenance of clusters.
Kops is an officially supported tool to be used with AWS.
Amazon Elastic Kubernetes Service (EKS)
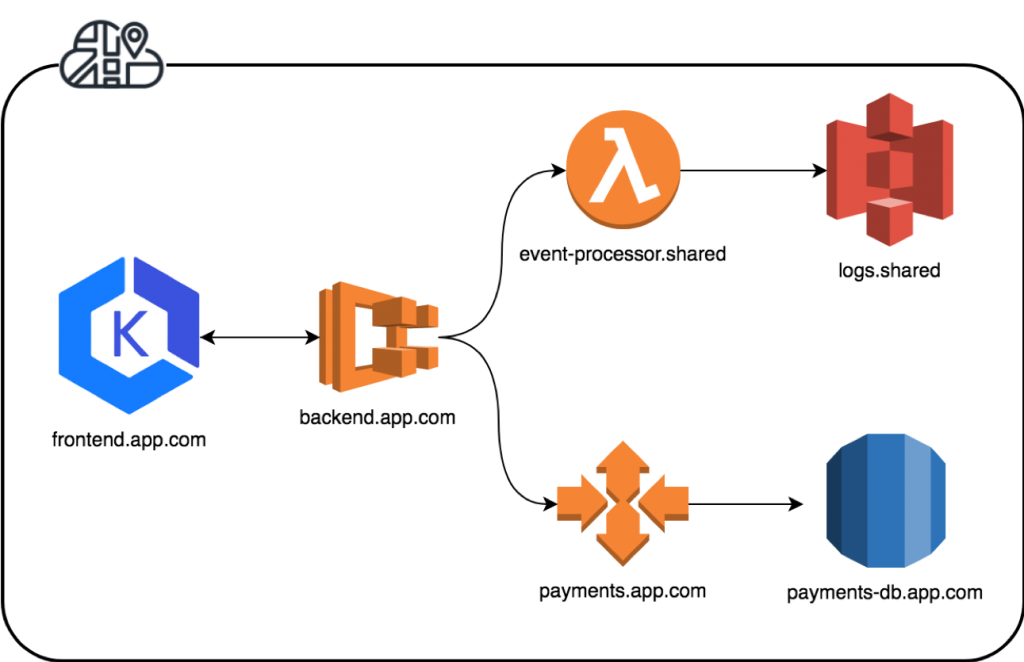
EKS is a managed service of AWS. It uses provisioned instances and provides a managed control plane for deployment. It runs Kubernetes without needing to provision or manages master instances and etc.
Deploy Rancher On Kubernetes Cluster
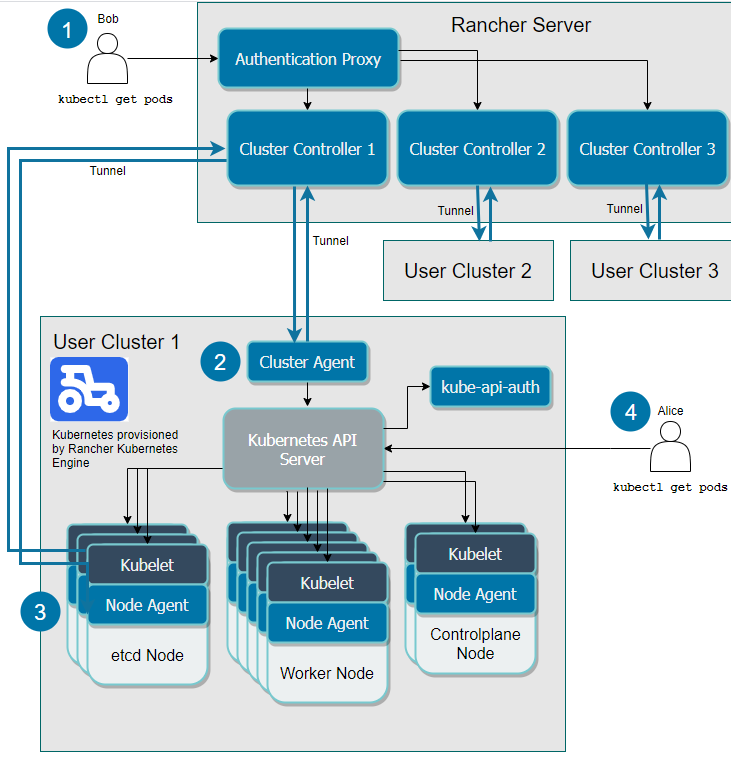
It is one of the enterprise computing platforms for providing complete solutions.
With the help of this tool, you can deploy Kubernetes clusters everywhere: on-premises, in the cloud, and at the edge.
The tool is widely preferred as it delivers consistent operations, workload management, and enterprise-grade security.
Creating a Kubernetes Cluster on AWS with kops
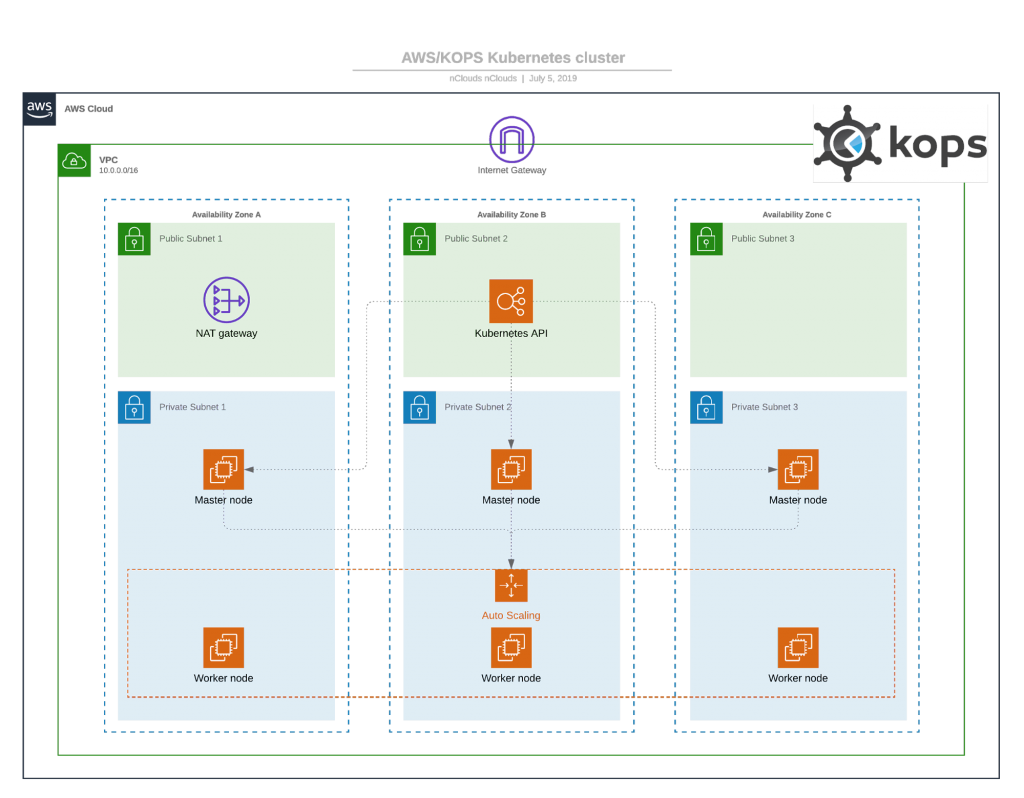
The simplicity of Kops attracts the organizations to opt for running Kubernetes with AWS. The main steps comprise:
Prerequisites for kops:
- Create an AWS account and install the AWS CLI
- Also, installation of kops and kubectl must be done as guided by AWS
- A dedicated user in IAM for Kops is required to be created.
- The next step is to set up DNS for the cluster, or, as an easy alternative, create a gossip-based cluster by having the cluster name end with k8s.local
To create a cluster on AWS using kops:
- The first step is to create two environment variables. NAME should be your cluster name, and KOPS_STATE_STORE set to the URL of your cluster state store on S3.
- Now on EC2 , you must check the available zone by running the command aws ec2 describe-availability-zones –region us-west-2. The command must end with the region, you wish to select. For example, us-west-2a is a zone you selected.
- The next step is to build the cluster
Note: Here we are showing the creation of a basic cluster without giving any specifications with no high availability:
- View your cluster configuration by running the command kops edit cluster ${NAME}. You can leave all settings as default for now.
- Run the command kops update cluster ${NAME} –yes. This boots instances and downloads Kubernetes components until the cluster reaches a “ready” state.
- Run kubectl to get nodes by seeing their availability.
- Now, run kops validate clusters to ensure the safe creation of the cluster.
Creating a Kubernetes Cluster with Elastic Kubernetes Service( EKS)
For the cluster creation and setup, AWS provides its own tool known as Elastic Kubernetes Service( EKS). It manages clusters and offers multi-AZ support to provide automatic replacement of failed or nodes.
EKS efficiently enables on-demand patches and upgrades to clusters. The three master nodes are created for each cluster, spread out across three availability zones.
This makes it dynamic by reducing the possibility of failure.
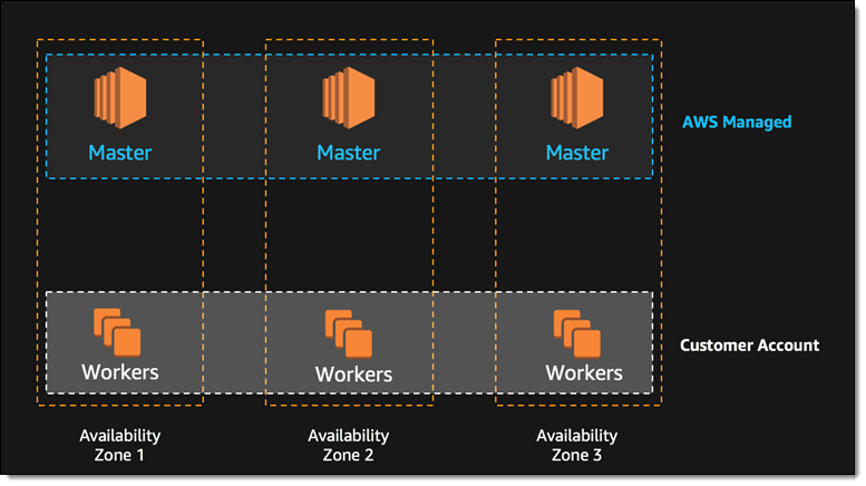
Some prerequisites for creating a cluster on EKS:
- An AWS account needs to be created
- An IAM role is also initiated for Kubernetes to create new AWS resources
- A VPC and security group for your Kubernetes cluster is created recommended by Amazon for safety measures
- To configure kubectl step by step instructions are followed . However, the steps are out of scope of this post.
Note: Follow instructions for installing the Amazon EKS-vended version
- The next step would be to Amazon CLI for the creation of a Kubernetes cluster using EKS:
- Open the Amazon EKS console and select Create cluster.
- On the Configure cluster page, type a name for your cluster, and select the Kubernetes version.
Note: If you don’t have a specific choice then install the latest version of Kubernetes.
- Under the Cluster service role, select the IAM role you created for EKS.
- In case, you haven’t opted to take the encryption option,allow the AWS Key Management Service (KMS) to provide this service for Kubernetes.
- The next step is to opt for the tags as they will allow you to use and manage multiple Kubernetes clusters together with other AWS resources.
- To view the networking page, click on the next. Select the VPC you created previously for EKS.
- Under Subnets categories, select the subnets to host Kubernetes resources. Under Security groups, you should see the security group defined when you created the VPC
- Under Cluster endpoint access, select Public to enable only public access to the Kubernetes API server, Private to only enable private access from within the VPC, or Public and Private to enable both.
- Select Next to view the Configure logging page and select logs you want to enable (all logs are disabled by default).
- Select Next to view the Review and create a page. Have a look at the cluster options you selected and you can click Edit to make changes. When you’re ready, click Create. The status field shows the status of the cluster until provisioning is complete (this can take between 10-15 minutes).
- When the cluster finishes creating, save your API server endpoint and Certificate authority – you will need these to connect to kubectl and work with your cluster.
Creating a Kubernetes Cluster with Rancher on EKS
Rancher as we mentioned above, allows you to directly use Kubernetes clusters on AWS. This can be within the EKS service, or across hybrid or multi-cloud systems.
A centrally managed cluster creation will ensure consistent and reliable container access.
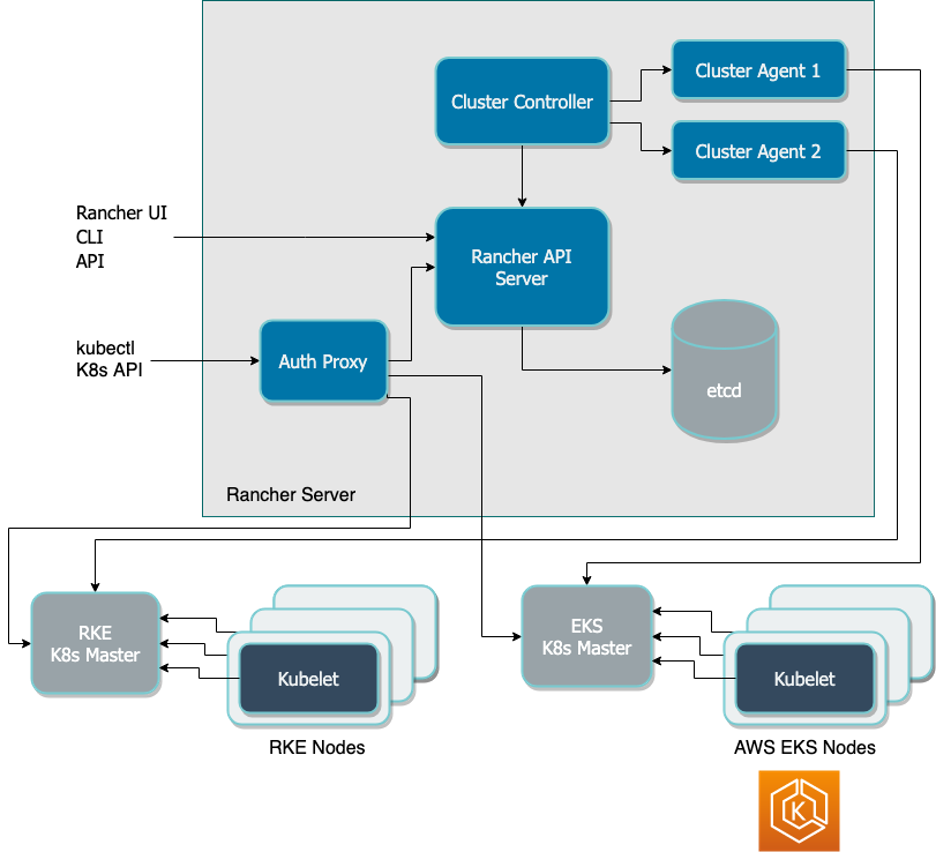
Rancher provides additional capabilities that are not present in Amazon EKS. Some of them are mentioned below:
Centralized user authentication & RBAC
Rancher can be directly integrated with LDAP, Active Directory, or SAML-based authentication services. This is how you will be able to enable a consistently enforced role-based access control (RBAC) policy in your Kubernetes. The management to provide access and permissions can be centrally managed thus reducing the admin tasks. It will ultimately save time and cost.
Providing Complete UI
Rancher is manageable from an intuitive web interface. DevOps teams will be empowered to deploy and troubleshoot workloads conveniently. The operations teams will effectively release and link services. The applications will be ready to run in multiple environments. In a nutshell , effective Kubernetes distribution and promotion will be able to increase workflow efficiency.
Improved cluster security
Security is the main concern especially when we are working with multiple cloud vendors at the same time. Rancher was designed to improve on the security part formulating policies for AWS and dictating how users are allowed to interact with clusters and how workloads operate across infrastructures. These policies can then be immediately extended while accessing other clusters.
Multi and hybrid-cloud support
Rancher includes catalogs of global applications that Kubernetes uses in clusters, regardless of location. The installed applications listed in these catalogs are ready for immediate deployment, creating standardized application configurations across your services. The already existing apps reduce the workload on the developers and make the new application run in a faster way.
Tools integration
Rancher includes built-in integrations with the Istio service mesh, Prometheus, and Grafana for monitoring, Fluentd for logging. The mentioned integrations not only manage deployments across clouds but also manage variations
Create a Kubernetes cluster on AWS with Rancher and EKS
Note: Here , we are listing the steps to configure with Linux, if you have any other server, then please make the necessary changes. Linux is preferred as its Docker command helps in easy setup.
- Prepare a Linux host with a supported version of Linux, and install a supported version of Docker on the host (see all supported versions).
- Start the Rancher server by running this Docker command:
- $ Sudo docker run -d –restart=unless-stopped -p 80:80 -p 443:443 rancher/rancher
- Open a browser and go to the hostname or address where you installed your Docker container. You will see the Rancher server UI.
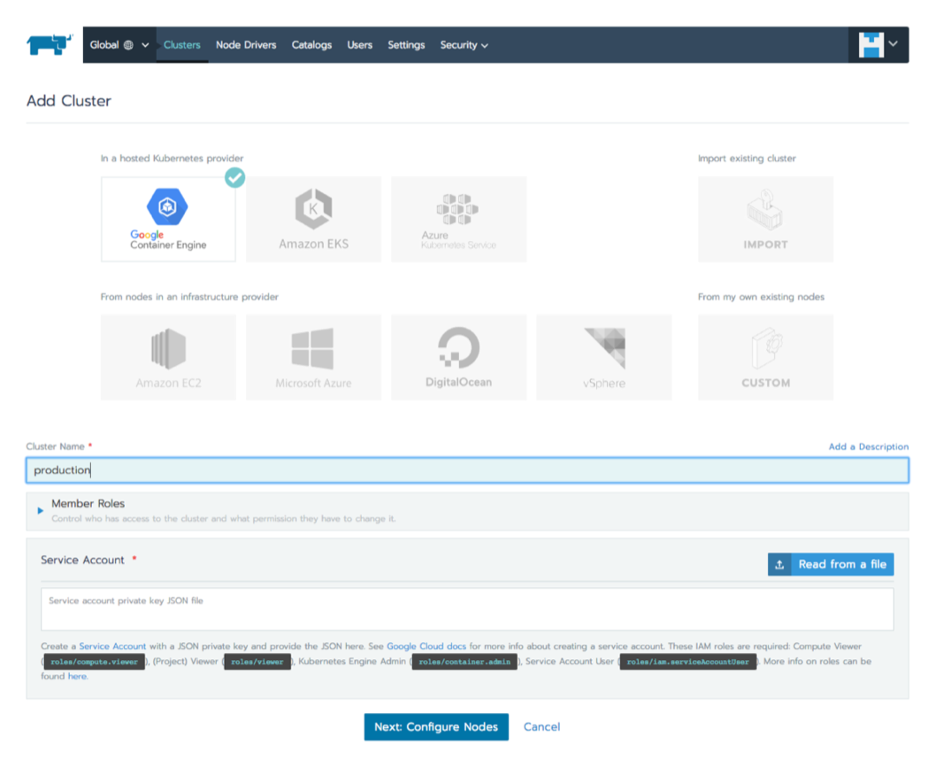
- Select Clusters and click Add cluster. Choose Amazon EKS.
- Type a Cluster Name. Under Member Roles, click Add Member to add users that will be able to manage the cluster, and select a Role for each user.
- Enter the AWS Region, Access Key, and Secret Key you got when creating your VPC.
- Click Next: Select Service Role. For this tutorial, select Standard: Rancher-generated service role. This means Rancher will automatically add a service role for the cluster to use. you can also select an existing AWS service role.
- Click Next: Select VPC and Subnet. Choose whether there will be a Public IP for Worker Nodes. If you choose No, select a VPC & Subnet to allow instances to access the Internet, so they can communicate with the Kubernetes control plane.
- Select a Security Group (defined when you created your VPC).
- Click Select Instance Options and select: a. Instance type – you can choose which Amazon instance should be used for your Kubernetes worker nodes. b. Customer AMI overrides – you can choose a specific Amazon Machine Image to install on your instances. By default, Rancher provides its EKS-optimized AMI. c. Desired ASG size – the number of instances in your cluster. d. User data – custom commands for automated configuration, do not set this when you’re just getting started.
- Click Create. Rancher is now provisioning your cluster. You can access your cluster once its state is Active.
Conclusion
To summarize, here we have discussed three ways to automatically spin up a Kubernetes cluster when using AWS.
You can run Kubernetes by using Amazon EC2 virtual machine instances or use the Amazon EKS service directly.
But most of the Kubernetes applications are presently running with the help of the AWS setup. The reason behind this is AWS collaboration.
AWS actively contributes to the Kubernetes community for delivering effective customer service.
The three ways discussed here: Kops, EKS, and Rancher with EKS empower Kubernetes with the ability to launch clusters on other public clouds or in your local data center and manage everything on one pane of glass.
Further Reading
- Best Kubernetes Enterprise solutions [Complete Guide]
- How to Deploy & Install Rancher on Kubernetes Cluster & Guide
- How to Deploy & Install Kubernetes on Bare Metal Server & Guide
- How to Setup Dynamic NFS Provisioning Server For Kubernetes?

Director of Digital Marketing | NLP Entity SEO Specialist | Data Scientist | Growth Ninja
With more than 15 years of experience, Loveneet Singh is a seasoned digital marketing director, NLP entity SEO specialist, and data scientist. With a passion for all things Google, WordPress, SEO services, web development, and digital marketing, he brings a wealth of knowledge and expertise to every project. Loveneet’s commitment to creating people-first content that aligns with Google’s guidelines ensures that his articles provide a satisfying experience for readers. Stay updated with his insights and strategies to boost your online presence.
