Contents
Android Developer Roadmap 2024
Mobile apps are facing a slowdown like other businesses. But at the same time, they have become our handy devices to provide 24/7 connectivity.
No matter what you do in your daily routine and where you are placed geographically, mobile apps are always associated with your chores.
Although coronavirus continues to be a constant threat to mankind yet connectivity using mobile apps is serving people to stay connected and informed.
Some of the apps, like groceries apps, video conferencing apps, and health service apps have emerged as the need of the hour. The mobile app developers have done an incredible job by developing needful apps, especially for health care and money transactions.
It was quite logical as in remote connectivity, technology advancement acted as a powerful entity that has changed the mindset of the people and working style.
In the coming times, In this scenario, it is sure that expectations from mobile apps are going to increase rapidly.
Taking a wise step and moving ahead by mastering the latest developments and learning android development will help you set miles ahead of all your competitors.
Here, we would like to mention that we must not forget that every minute, a new app is loaded on the Google Play Store, The success rate of an app is quite low, especially for Android apps.
Taking this into consideration it is vital to adopt advanced techniques while you are on your way to developing a fresh app.
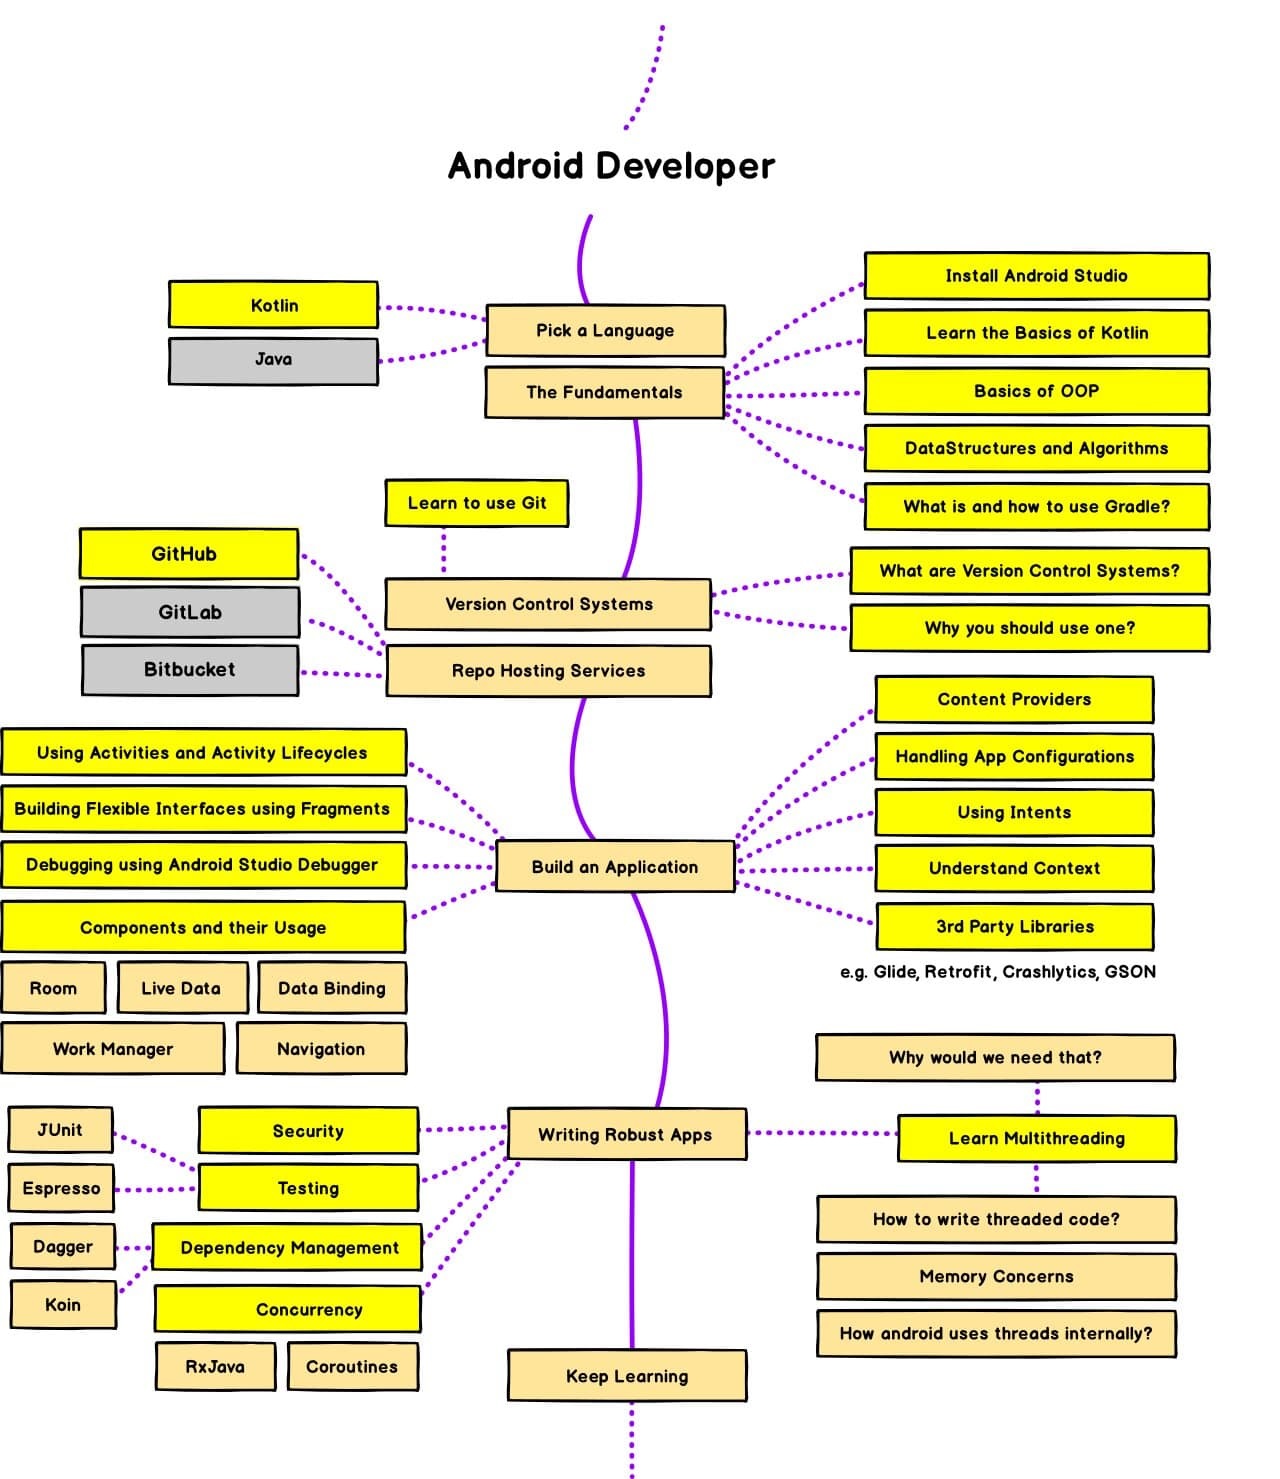
Here in this post, we have come up with a roadmap for native Android App Development.
The latest technologies such as flutter, react-native, or NativeScript are the latest buzz for Android App Development. Let’s look at this topic in detail:
Top Android App Development Challenges
Before we initiate the development phase, the following key factors are to be considered. You must be wondering how are they going to affect the development cycle. Well, it is. Let us understand how?
Idea and Target Audience
In the immensely overcrowded app market, your app must stand out from the rest. Planning an app based on the idea of the already existing app having the same features won’t do any good.
Right from the very beginning, you have to be very sure about your target audiences and their requirements.
What could be the solution? Well, you should first think of an innovative idea and the features to incorporate. This way you will be directly addressing the need of the target audiences.

Market Research
Market research is one of the most difficult and crucial steps in the mobile app development roadmap. Thriving market research will answer the following questions:
How unique is your app idea?
Is there a market for your app?
Will the app be easily accessible?
What strategy will drive the target audience?
Have you analyzed your product or service?
Where will it be sold?
Who is your target audience?
Who are your biggest competitors?

Team Building and Resources
As we have seen the need to adopt the latest technology for Android app development, it becomes even more necessary to have a team that can do the coding as per the required standards and meets the expectations of designing and security of the app.
We must be aware of the fact that finding experienced and skilled developers is no more an easy-going task. So, make the process easier by doing the following:
Develop expertise to test the practical exposure of developers
Track the real experience in the android app development
Check their communication skills
Make sure of their creativity and their UI/Ux skills
How can they add value to the new apps?
Another option is to consult an app development company. This will be a cost-effective option to develop a quality app.
Restricted Budget
For the apps, most companies allocate a small budget. So, it becomes indispensable to plan accordingly. The situation becomes challenging as in any app development you need to research, design, development, launch, and marketing within the minimum time.
When you are budgeting for a new app, the following points can make a huge difference:
- Are you building a hybrid or web app or a native android app?
- What will be the cost of development and maintenance?
- What is the nature of the app?
- How many apps of the same category already exist?
Considering the answers to these questions, you can develop a strategy to go ahead with app development. We have seen that some great ideas fail when similar ideas already exist.
What is required to become an android developer in 2024?
Hard decisions. Dedication, passion, crystal clear vision, and winning strategies, are the only way to develop a successful app. So, let’s quickly brush up on the knowledge gained so far before we move on to the development part.

Validate your Idea by doing a detailed market research
Consider the Wireframe of the android app
Resolving Bugs via Application Testing:
Keeping the Monetisation strategy in Place
Develop a solid deployment and App Launch policy
Ask yourself: Would you like to buy this app? If you get a “YES” from your heart then, make a list of the following and start now!
App objective
Target customers
Unique features of the app
Competitors analysis
Investment in the app
App Marketing
Maintenance of the app
Focus on App Marketing
During this process, ensure the usability, compatibility, security, and performance of the app.
Android App Developer Roadmap 2024

With the evolution of rapidly changing android technologies, it is a big decision for an android developer to choose the platform, language, version, and so many other things.
In this post, we are taking an insight that will help you set a road map for developing an engaging android app:
Choosing the Right Environment:
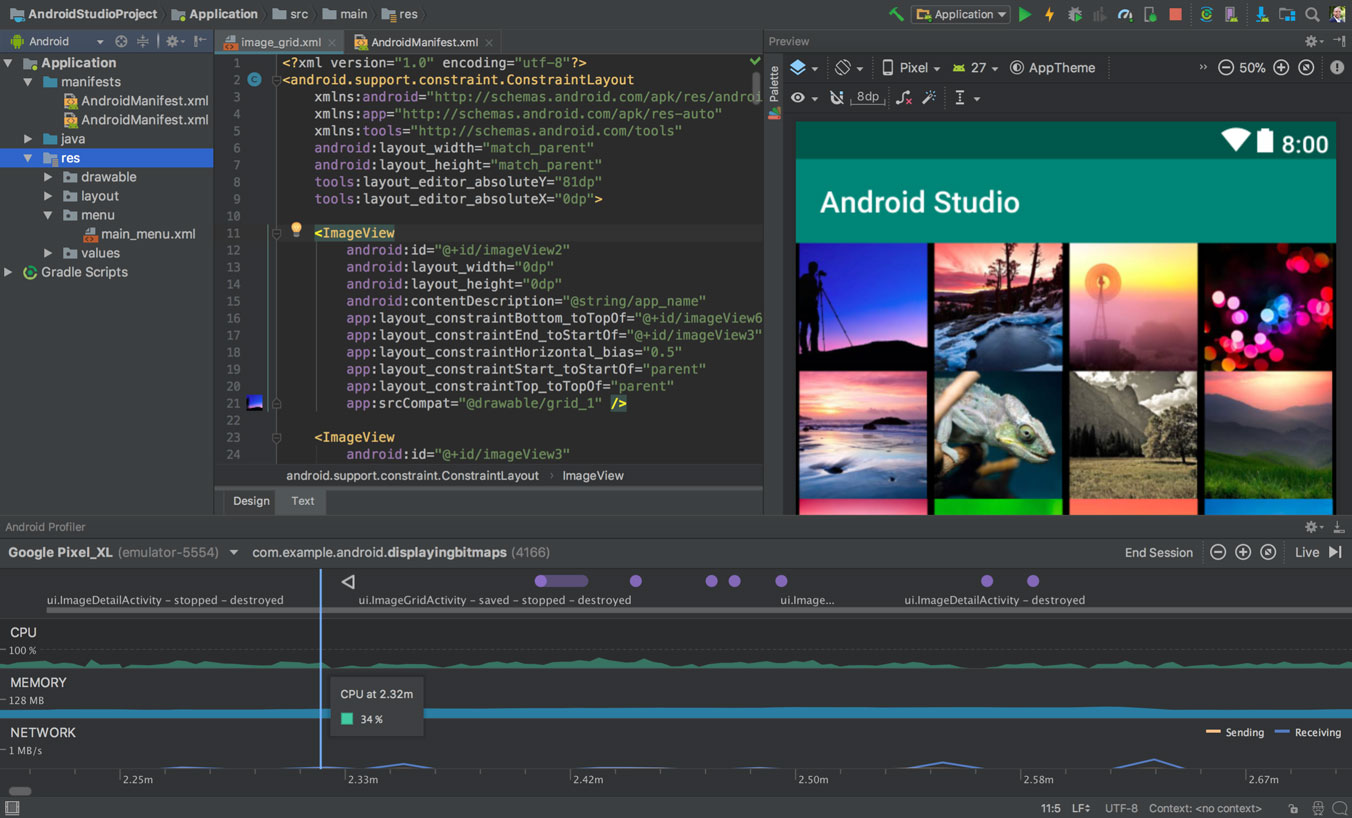
First, you need to create your development environment to make your desktop ready to support Android development goals. The Android Studio and the Android SDK need to be installed on your computer and they are available at the following link.
Android Studio is an IDE ( integrated development environment), an interface where your code can be entered (primarily Java or Kotlin).
From here access can be provided to other tools necessary for development. Android Studio permits to access of libraries and APIs from the Android SDK.

This also allows you to access the native functions of the operating system. Here, we would like to mention that APK is a tool that can allow the creation of your app in a virtual environment.
Pick up the language
For Android app development, two popular languages: Java and Kotlin are used. Since December 2019, Kotlin is a preferred language for Android Apps. Because of the reasons mentioned below:
Kotlin is a good compiler that is specially designed to develop Android Apps.
Kotlin is fully compatible with Java frameworks and libraries. Also, it can be used with Marven and Gradle build systems. Kotlin is more concise than Java. Some features of code conciseness are:
-
- Data classes
- Smart casts
- Type interface
- Properties
Safer Code with less number of crashes
Smarter and Safer Compiler that can handle run time errors and fix the bugs faster
Easier to Maintain with boosted productivity
Better Support for Functional Programming
It Has Null in Its type system which is a sore point in Java. The“null,” value is common in android, Kotlin uses a type system to place the null value in right place.
Android SDK
The Android SDK contains API libraries that help developers to use the necessary tools to build, test, and debug apps for Android. Choose the SDK package for your OS from the link below:
Eclipse
Eclipse is an IDE used for Android app development. For the installation, go to the link; https://www.eclipse.org/ and install it.
ADT Plugin for Eclipse
Eclipse IDE uses Android Development Tools (ADT). It is a plugin designed to give you an integrated environment to develop Android applications.
ADT plugin installation steps to follow are :
Start Eclipse, and click add on Install New Software.
Add Repository dialog box has a message to enter “ADT Plugin”
follow the URL for the Location: https://dl-ssl.google.com/android/eclipse/
and click OK.
In case of any issue accessing the plugin, try using “HTTP” in the Location URL, instead of “https”
Now, select the checkbox next to Developer Tools and click
In the next window, a list of the tools will appear that can be downloaded. Click Next.
Accept the license agreements after reading them and then click on Finish.
If a security warning appears showing the message, authenticity, or validity of the software can’t be established, click OK.
When the installation completes, restart Eclipse.
After restarting Eclipse, specify the Android SDK directory location by following the below-given steps:
In the “Welcome to Android Development” window will appear, select Use in existing SDKs.
Select the location of the Android SDK directory that you downloaded.
Click Next.
For more detailed instructions, visit the link: https://developer.android.com/studio
Android SDK packages
Press button on Eclipse IDE or launch the Android SDK Manager.
This installation of packages for the Android SDK starts. You need to do the following to complete install:
The tools folder (both “Android SDK Tools” and “Android SDK Platform-tools”) will be installed
Android 2.1 (API 7): SDK Platform, Google APIs for the map applications will be installed
Android 2.3.3 (API 10)
SDK Platform
Google APIs
Note :
In each Android version on the folder, there is also a package called “Samples for SDK”. It has some useful samples that can be helpful
http://developer.android.com/about/dashboards/index.html.
Set a Device for Android Development
Turn on “USB Debugging” on the device ( laptop or desktop).
Open Settings, go to Applications, then open Development to enable USB
Let your system to detect the USB.
For Windows, you have to install a USB driver
. Follow the installation instructions and links to OEM drivers, go through the OEM USB Drivers document.
On Mac OS X, you can skip this step as it connects automatically.
For Ubuntu Linux, you need to add a udev rules file that contains a USB configuration for each type of device.
Vendor ID, as specified by the ATTR{idVendor} property.
For the device detection on Ubuntu Linux:
- Log in as root and create this file: /etc/udev/rules.d/51-android.rules.
Use this format to add each vendor to the file:
SUBSYSTEM==”usb”, ATTR{idVendor}==”0bb4″, MODE=”0666″,
GROUP=”plugdev”
Note: The rule syntax varies for different environments.
Setting up a Virtual Device for Development
An Android Emulator is used for testing the device. Here we are referring to
Android Virtual Device (AVD) which is an emulator configuration to model an actual device by defining hardware and software options to be emulated.
To create an AVD is to use the graphical AVD Manager, which you launch from Eclipse by clicking on Window and then AVD Manager. You can also start the AVD Manager from the command line by calling the android tool with “avd” option, from the <sdk>/tools/ directory.
An AVD is created with the following parameters:
Name: Android21
Target: Google APIs (Google Inc.) – API Level 7
SD Card: 64 MiB
Skin: Built-in: WVGA800
Hardware:
Abstracted LCD density: 240
Max VM application heap size: 24
Checking that everything works fine
Now that all necessary software is installed and configured, it is time to create the simplest Android application possible and run it.
From Eclipse, click:
- File > New > Other… > Android > Android Application Project
- Enter:
Application Name: HelloWorld
Project Name: HelloWorld
Package Name: gr.uoc.csd.hy539.helloworld
Build SDK: Android 2.1 (API 7)
Minimum Required SDK: API 7: Android 2.1 (Eclair)
[Unchecked] Create custom launcher icon
[Unchecked] Mark this project as a library
[Checked] Create Project in Workspace
- Click Next
- Select
[Checked] Create Activity
blank activity
Click Next
- Type
Activity Name: MainActivity
Layout Name: activity_main
Navigation Type: None
Hierarchical Parent:
Title: MainActivity
Click Next
- In case a compatibility library is needed, install it
Click Finish
Connect your Android Device to your computer, using the USB cable.
Note: Skip this step, if you prefer to use an AVD
- On the Package Explorer of the Eclipse IDE (left side), right-click the newly created
- project “HelloWorld” > Run As > Android Application
If everything goes well, your “HelloWorld” app should be successfully launched!
Key Takeaway
Android app development is not a one-time event as there is always room for improvement. So, gt expertise and try enhancing your skills as an app developer
Don’t cling to the misconception that you will get the perfect version of the app in the first go. The successful apps have gone through several improvisations.
Many versions of these apps are released as per the customer’s feedback and have evolved as per the customer’s feedback.
If you’re looking for expert assistance in pushing the boundaries of mobile app development with AI integration, RedBlink is your trusted partner. Our team of experienced ChatGPT developers can collaborate with you to build cutting-edge apps that leverage the power of AI. Whether it’s enhancing user experiences, automating tasks, or implementing intelligent features, we’re here to turn your ideas into reality. Contact us today to discover how RedBlink can be your catalyst for success in the dynamic world of app development.
Also Read –
- How To Become A Full-Stack Designer?
- How To Become A Full-Stack Developer?
- UX(User Experience) Design Process Stages

Director of Digital Marketing | NLP Entity SEO Specialist | Data Scientist | Growth Ninja
With more than 15 years of experience, Loveneet Singh is a seasoned digital marketing director, NLP entity SEO specialist, and data scientist. With a passion for all things Google, WordPress, SEO services, web development, and digital marketing, he brings a wealth of knowledge and expertise to every project. Loveneet’s commitment to creating people-first content that aligns with Google’s guidelines ensures that his articles provide a satisfying experience for readers. Stay updated with his insights and strategies to boost your online presence.
